How to grind the toe area of a boot

When I'm trying boots, more times then not I end up right between 2 boot sizes. A size 9 is perfect in the heel area but the toes are too tight and a size 10 the heel is too big but the toes are perfect. In the last 10 years I've tried stretching carbon toed boots in every way possible with not the best of luck. I've also found I prefer the ankle area in carbon toed boots over leather toed boots. Why? I have no idea.

The boots that cradle the toes with leather only (which works best) seem to have ankle areas that I dislike. This article is to help you take that boot that is perfect in the ankle area but uncomfortable in the toes and give you another 1/2 to 1 full size larger in the toe area. Below are 6 images showing the carbon shell of a boot that comes up an inch in front of the toes (carbon toed boot) and the other is the shell of a boot that doesn't (leather toed boot).

Even if these two boots were exactly the same length you would have a 100% better chance of the toes fitting in the boot with the leather only coming up the sides cradling the toes instead of the boot that has the 1 inch of carbon cradling the toes (feels like a brick wall).
Boot Grinding 1
Boot Grinding 2
Boot Grinding 3
Boot Grinding 4
Boot Grinding 5
Boot Grinding 6
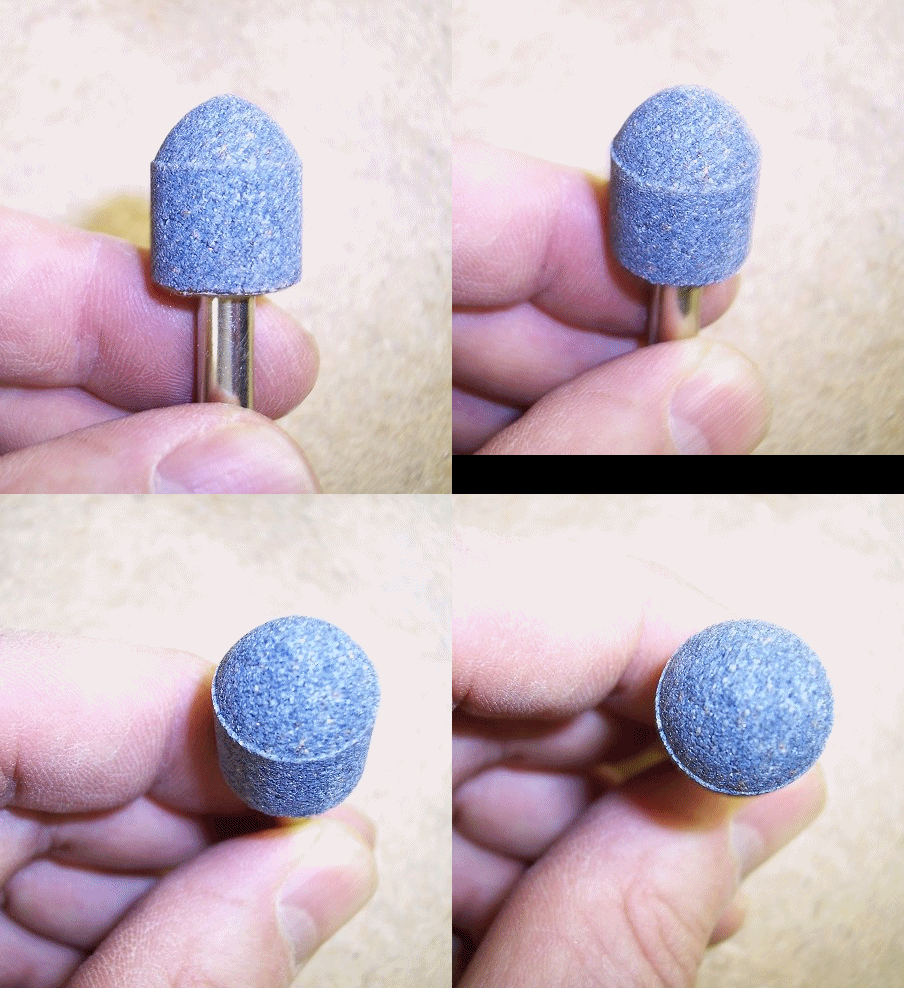
So when I have that size 9 carbon toed boot that is perfect in the heel but the toes are to tight and the size10 that is good in the toes but the heel is to big I grind the toe out of the size 9. I go inside the boot with a dime size rounded stone bit with a die grinder (used with a compressor) or dremel and grind from the inside of the boot through the inside leather, through the carbon or plastic shell and leave the outside leather to cradle the toes.

Not only have I made more room by taking out the inside leather and carbon but my toes are now cradled by the elastic outside leather instead of the brick wall like carbon shell. This makes a huge difference. You also go from the toes up against the carbon which will never give or break in, to the outside leather cradling the toes which will break in and eventually give the toe extra space (if needed). Below is a set of grinding bits, I use the upper right one in this kit.
Boot Grinding 7
Below is a closeup of the stone bit I use, kinda like the size and shape of the end of a toe.
Boot Grinding 8
Below is a picture of a die grinder or dremel I would use.
Boot Grinding 9
Boot Grinding 10
The first thing you want to do is mark the inside of the boot. To do this you will need black or white shoe polish. Use white shoe polish if the inside of the boot is black and black shoe polish of the inside of the boot is white (pictured below).
Boot Grinding 11
First get the polish going (below).
Boot Grinding 12
Then take your sox off and mark the toes that are tight in the boot (below).
Boot Grinding 13
Boot Grinding 14
Now be careful when you put your foot in the boot to mark only the areas that need to be ground and no others (below).
Boot Grinding 15
Here is what the inside of the boot looks like before and after marking (below). (I used a Verducci Red boot for this article because the inside is white and easy to see)
Boot Grinding 16
Boot Grinding 17
For the next step I usally leave the frame on and put it in a vice with leather around the frame. (below).
Boot Grinding 18
Here I am starting to grind (below).
Boot Grinding 19
Boot Grinding 20
Boot Grinding
Boot Grinding 21
Below is the tool I use to blow out the carbon fibers after you've ground. If your using a dremel and don't have a compressor you can use canned (spray can of air used to clean computer parts).
Boot Grinding 22
This is what it looks like when the 2 spots are done.
Boot Grinding 23
In both spots there is now nothing but the supple outside leather to cradle the problem toes. Below I'm pushing my finger through one of the spots of supple leather that before with the carbon there would have been impossible to do.
Boot Grinding 24
Now when your grinding your constantly stopping and using your finger from the outside to push in on the spot your grinding checking to see if your coming through the carbon. If you are coming through the carbon you will feel the outside leather start to push in, if you can't push it in your not through the carbon yet. Even when you are through the carbon you can continue to thin the outside leather to gain more room and elasticity if needed.

Also continue the plane of the bottom of the boot beyond the carbon lip. You don't want your toes to be riding up or down on the ground area. You always want to start with less grinding than you need as you can always grind more but you can't put it back. I know this sounds like a radical procedure but I've found it to be the only way to get the perfect boot I'm looking for. Also your doing this to a boot that already isn't working so this is giving you a chance to take a boot that doesn't work and turn it into a boot that does. I can find the perfect ankle area in a boot but chances are I have to customize the toe area of the boot to be the perfect fit.

People come to me after bringing their custom or off the shelf boots to the major companies multiple times where these companies go in and try to heat the toe area and stretch it. This doesn't work. They come to me thinking what could I do that a major company couldn't do after they brought the boot back to that company 5 times or more. They can't grind the carbon out of the boot is what they can't do. It would make them look bad. Within 5 minutes I can fix what seemingly for a year looked like it would never be fixed.

I have women hugging me months after grinding their boots exclaiming how happy their bunions are after a grind. So this isn't something your happy with for a couple of days, the problem areas of your toes against that soft outer leather stay happy. I eventually ground out the entire front of the boot pictured from the base of the pinky toe to the base of the big toe. The ankle area of this boot is perfect now the toe area is like a slipper, what more can you ask for.

If you do ever grind through the outside leather (I have ground over 500 boots and I have never gone through) you can contact cement a strip of appropriate colored leather over the entire front of the boot to make it look like a scratch guard.

If you have any question you can email me at: support@nettracing.com


Additions:

Rich - THANK YOU! I ground out my boots over the weekend - and it wasn't that bad at all. I was pretty leery of making the modification when I first read about it, but it's not difficult at all, and there's very little chance of grinding through the boot. It took only about an hour total - checking the boots for where they needed to be ground (wow - was that a wakeup call to see how tight those toes were packed in there!), marking out the areas to grind, grinding out the carbon (amazing how stiff such a small amount of carbon fiber is) and re-fitting the boot. There's still a little tightness for one impacted toe - but I think now that there's just leather to press against, I'm hopeful it'll stretch over time. You're right about this process making for a custom boot - It's amazing the amount of comfort gained in so simple a task - and the leather really does wrap right around the toe area. Again - thanks! Dave

Hi Richard, Read your article about grinding out the toe, did it to mine, and WHA-LAH! Nice, nice adjustment. Thanks for taking the time to put it together. You're very much appreciated! Lowell

Hi Rich, follow-up: After skating in them for a couple of weeks, my big toes started to develop some heavy callouses on them. So, I took your advice and got out my trusty Dremel, and ground away the carbon fiber that was bearing on them. It was an easy fix, and only took about 5 minutes per boot. I used a small shop vac to vacuum out the carbon dust, rather than canned air...worked like a charm. What a difference!! I'll never skate with unhappy toes again. They are now, and will forever be, cradled in the soft luxury of their own custom-made toe cutouts. Thanks for showing me the way. I am still loving these boots! Todd A.

Got them all done....... I took out all the inner padding from the front to
the third eyelet... Dremelled out a little carbon. Basically shaved some....
They fit like a glove now... Thank you for the link and the emails. Scott

Hi Richard, Thanks for everything. I ground out the tight spots and my boots fit like a glove. Now it's time to learn the double push! Thanks for your on-line guide. Trevor V.
Toll Free Support Line:1-800-668-5280
Visa, Mastercard, American Express, Discover, Paypal
Hours: Monday - Friday 10am - 6pm
Authorize.net
Copyright © 2000 - 2024 Nett Racing.  All Rights Reserved